How to Streamline your Autodesk Inventor Workflow

Do you ever notice that during your daily work routine, how you end up repeatedly issuing the same commands? You may not even realise how much time you are spending on these repetitive actions, time that could be used more effectively for other tasks if you had the opportunity to make your routine more efficient.

How to Streamline your Autodesk Inventor Workflow

Some of these actions might be very simple and easy tasks that you don't necessarily consider as troublesome. However, performing these actions repeatedly can significantly increase the time you spend on a particular task, especially if you dislike repetitive tasks, which can quickly become exhausting.

But don't worry, I have a solution for you. Let me introduce you to a few features available with the Sovelia Inventor. This toolset can assist and enhance your workflow by automating tasks you commonly perform with Inventor.

Join me as I guide you through these different features, showing you what you can achieve by using Sovelia Inventor with Autodesk Inventor.

Part list editor

From the drawing environment you can edit the Bill of Materials directly without even opening the assembly and access the BOM table.

Sovelia Inventor

Place your Part List using the Part List (Cadit) Sovelia feature.

Launch the Part List Editor to open the Parts List Property Editor dialog box and double click the component you want to edit.


The property Editor dialog box will appear, and from there you can directly edit the properties for that component e.g. the material.

Edit Properties from the Part List

Apply, and update the properties in your assembly - with the Update Properties Sovelia tool - the BOM will update accordingly.

Inventor

Once you have placed the Part List inside your drawing, you can manually edit the material e.g. shown with the Part List table ...but it’s not going the change the Property for that component or the BOM of that assembly.

Editing a property doesn’t update the BOM

The workaround for this would be, every time you change one of the properties you have to open the assembly and open the Bill of Materials table from there to update the values that you want for the BOM.

Then the Part List inside your drawing will update, but that unfortunately doesn’t work the other way around.

Visibility 

The Visibility dialog box is an easy way to turn Working features on or off from your project, or even turn visibility off for Parts and Sub assemblies.

Sovelia Inventor

Access this dialog box from the Sovelia panel when you are in an assembly environment.

Turn planes visibility on

The following dialog box will appear, letting you choose what you want to hide or keep on the screen. It doesn’t need much explaining as it explains itself very clearly.

Visibility dialog box

Inventor

Without Sovelia, you need to select the component you want to temporary hide, right click and turn Visibility off from the marking menu.

That is not complex, but you then would be required to do the same for each component individually.

Turn visibility off for the selected plane

Also, if you wanted to hide the working features, planes or axis, you would need to access them inside the components and turn them off once they are selected.

Property Editor

A very handy tool that allows you to check data from your components very easily. I found this particularly handy and I consider this one of my favourite features included with Sovelia.

Sovelia Inventor

You can access this tool from the Sovelia panel, the name is Property Editor and from there you can access a pallet with properties data (customisable).

Property Editor Setup – to customize your pallet

Very easy to access and also very easy to navigate.

The main advantage of this tool is that you can keep it open on your screen, or even drag it into the browser column, and leave it open while you work on your design (like the properties pallet of AutoCAD if you have worked with that).

Pallet dragged into the browser

And so, when you are in an assembly, just select a component and you will be able to see the data related to that component, and keep it visible.

Then when you select another component, the pallet will show the properties of the new component selected. Pretty handy!

Properties of a selected component

Inventor

To check the properties of one of the components assembled in your assembly, you can right click in the browser over that component and access the iProperties.

iProperties

That then opens the iProperties dialog box, where you can edit, fill any field you want or just double check some information regarding that component.

Though because it is a dialog box, if you don’t click Close, Cancel or Apply you are not able to continue with your design until that dialog box is open.

Component Library

You might have already used the Content Center Data if you are working with assemblies that require standard purchased parts which you don’t need to design from scratch every time.

Sovelia Inventor includes a large library of components and covers multiple different business. These can easily be edited using the Parameter Editor ( included with Sovelia).

Sovelia Components library

An example of some components included are: handrails, stairs or ladder, just to mention a few. So not only simple parts, but very complex sub-assemblies of components!

Make Drawing and Make Part Drawings

This next feature I would like to show you could be one of those you would require and use the most from this add-in. I’m not just talking about saving time, which of course is a good factor (and this feature will help in that as well) but about repetitive tasks! As I touched on in the beginning, repetitive tasks can, in the long run, become annoying and stressful. Let me show you the difference between the software with Autodesk Inventor and without.

Sovelia Inventor

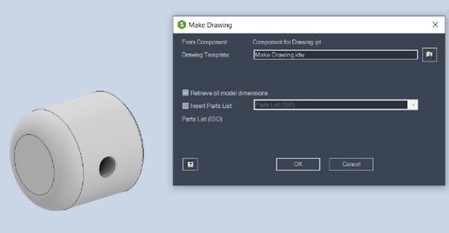
Once you have your part defined and saved, choose the option “Make Drawing” inside the Sovelia panel. A dialog box will appear, and from there you can decide which template you want to use for your drawing and if you want to retrieve all model dimensions.

Sovelia Make Drawing tool

It is that easy! Once done your drawing is all set up for your finalisation, with a base and projected views already placed on the sheet and with all the model dimensions retrieved.

Views and dimensions. Using your drawings template

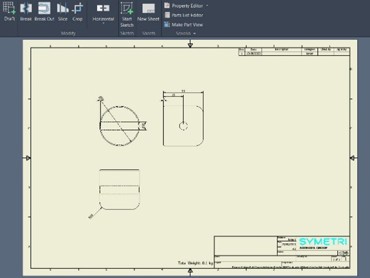
At this point you only need to add other information or plot out your design. For that job, why don’t you use the Sovelia “Publish to other formats”?

For assemblies there is even the feature to “Make Part Drawings”.

This creates a drawing for each component of your assembly effortlessly.

This is really a time saving feature.

Make Part Drawings settings

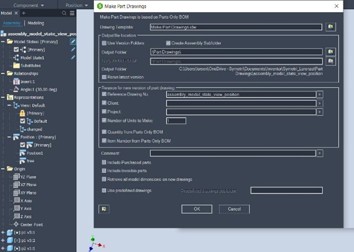
All the options we saw for the part are still available inside this new dialog box. With a few more options and a path folder location. You can also decide the number of units to add in the bill of materials.

Inventor

To complete this task, you first need to create your part, create a new drawing from scratch and place the base view with related projected views.

You can then retrieve the model dimensions. From the Annotate tab you will find the option to retrieve sketch and feature dimensions or 3D annotation.

Retrieve model annotations

All of this is a sequence of steps that needs to be done sequentially, like a routine you need to go through, lots of clicking your mouse and launching various features.

To create a drawing for different components you would need to generate separate drawing files from scratch then place the component base view and projected views and repeat for each component you want to have a drawing for.

All of this requires a lot of time.

Publish to other formats

There are many different formats, if you are in a 3D environment this could be a part (.ipt) or if you are in a 2D environment, a drawing (.idw). The choices of the format you can export depends on the environment you are working in. This is also valid for the Sovelia tool to quick publish your file.

Sometimes you need to export your file frequently, and with this Sovelia tool you can do this incredibly easily, allowing you to skip many steps.

Sovelia Inventor

From the Sovelia Panel, select “Publish to other formats” and click the box of the file type you want to create. That’s it, done!

Publish to other formats for a part

Publish to other formats for a drawing

Inventor

To do this you need to go into File, Export and select CAD Format.

Export CAD Format

A dialog box will come out and from the dropdown menu choose the type of file you want to create.

file type

Sovelia Help

Sovelia Help icon

How can I get help if I get stuck with one of the Sovelia features? Do not worry! Within the software there is a Sovelia Inventor Help dialog box with a browser where you can find feature descriptions to help you along the way.

Sovelia Inventor Addin Help

Sovelia  - reducing manual and tedious work in Inventor

As you can see there are many benefits using this software and many of these features can also be customised according to your needs.

This is just a handful of features available within this toolset, but there are many more! Other features such as ERP Lookup, Weldment and other specific tools could benefit you greatly if they are things that you deal with on a regular basis.

In this blog I compared Sovelia Inventor with a normal Inventor workflow. Some features, such as the component library, can’t be compared as they are an innovation, and not directly present within Inventor or you would need to go through a workaround to obtain the same result.

I hope you have found this helpful. If you have any questions or would like a demo please fill in the form and one of our experts will be in touch.

Blog

Understanding Autodesk Vault Purging

26 July 2024

With the release of Vault Professional 2025, users can now purge their files as part of a lifecycle, making this a more seamless process and part of a standard user workflow. However, purging has been available either per file and initiated by the user or on the entire vault initiated by a server administrator.

Learn more